
I’ve always been somewhat enamored by stars and space. Even as I got older, I still love to stare up at them with wonder. And I’ve always found something captivating about those star trails photos you see… The cosmos swirling wildly above the landscape. Here’s an amateur’s guide on how to take star trail photos that will impress your friends! 🙂
What little kid doesn’t want to grow up to be an astronaut? Just me? As a young teenager, I used to launch large model rockets. My college astronomy course was definitely the coolest of the requisite couple science classes I had to take as part of my liberal arts degree.
While my dream of traveling into space (come on Elon Musk!) remains unfulfilled, I still can get my space fix with a little astrophotography.

How to Take Star Trail Photos
Most star trails images in the digital age are the result of significant post-processing.
There are two typical methods to accomplish star trails:
1) Bulb mode, whereby you leave the shutter open for as long as desired to capture movement, which worked great for film, but is often impractical with digital due to battery limitations, sky glow, or excessive image noise
2) You can take hundreds of shots over time and then stack the images with computer software.
I’d never had a camera that could truly capture those types of scenes, no more than just a 30-second exposure, until recently.
My Sony NEX-6 camera, coupled with the time-lapse app–which costs an additional $9.99 from the app store (kinda ridiculous, considering the price of the camera itself) enables the capture of star trails.
With the time-lapse app and a decent tripod, I would be able to take hundreds of photos over many hours and then combine the photos digitally after the fact to create my final desired image.
In this article, we’ll be discussing how to take star trail photos by analyzing three different attempts here in California’s Eastern Sierras, the star trail photography settings for each, what went well or not so well, and some practical tips on how you can improve your star trail photography.
First Sierra Star Trails Photo
The first night I decided to attempt another star trail shot, I wasn’t really prepared to do so. That’s mistake number one.
My camera battery didn’t even have a full charge. I also was setting up in the dark, which makes it challenging to achieve exact focus on distant and dark objects like the mountains.
I know there are various tricks like focusing on the moon or bright stars, or using a bright flashlight in the foreground and focusing on that, but the only thing I tried in this attempt was to focus on the moon.

The first attempt was lacking in focus and sharpness on the distant peaks.
This shot consisted of approximately two hours of exposures at a 28mm focal length (42mm). Exposures: 13 seconds, f4.5, ISO 1600.
The focus is absolutely critical and this one was lacking–it has been “improved” by increasing sharpness and clarity in Adobe Photoshop Lightroom, but that only goes so far.
I learned the importance of setting up early and preparing your camera and set up before sunset or dusk. I also had a decent bit of star “wobble” from shots at the beginning of the sequence due to wind, so I just deleted them from being processed.
So, not great, but it taught me some things…
- Prepare before dark by framing your shot, using manual focus, setting up the tripod, etc.
- If your tripod isn’t necessarily heavy duty, be sure to keep it as low as possible to minimize wobble. You can also add weights or bracing to help support the tripod.
- Make sure you have at least a bit of moonlight to help light up the foreground elements, otherwise you’ll end up with dark silhouettes.
Second Star Trails Photo Pre-Game Setup
The next day, as the sun was setting, I set up my tripod, framed the composition, and preset the focus manually on the distant peaks.
Getting the shot in focus during the daylight was the main goal though–the continuous focus rings (like the Sony NEX-6) have proved difficult to get sharp landscapes in the dark.
In terms of the star trails photography settings, I also turned off image stabilization, high ISO noise reduction, and other unnecessary settings to maximize battery life and reduce image processing time.
I had the tripod at the lowest setting to the ground (most stable) and then weighted/braced with two 2.5 gallon water jugs.
It was quite windy that evening, and I got some “movement” in my star trails from the previous night’s attempt and had to dump a number of frames at the beginning.
I then hung out in my truck and read a book, waiting for the sun to set and for the sky to get sufficiently dark (at least 90 minutes past sunset).
I actually started 2.5 hours after the official sunset time since I was waiting for some clouds to (hopefully) dissipate. Ideally, I would’ve started earlier to allow a little more dark sky before the moon rose.
I took a few more test shots at the settings I was planning to use, and then took one “dark frame” shot with the lens cap on at the same settings.
This dark shot can be used during image stacking for noise reduction.
Then I launched the time-lapse app, and then like Ron Popeil, I could “set it… and forget it!” I went back to my pickup truck camping setup to watch some Sopranos episodes on my travel laptop.
The camera took a total of 864 shots over the course of three and a half hours with 13-second exposures at f3.5 with an ISO of 1600 with a two-second lag time between shots (15-second intervals in the time-lapse app). The widest angle with my lens selection was a 16mm focal length (24mm equivalent).

One of the many original shots before being combined. This one before the moon came up.

One of the many original shots before being combined. This one after the moon came up.
I used a custom theme setting in the time-lapse app, and not their Night Sky theme, but I used similar settings like 1600 ISO since that’s what I used the night before (here’s that photo), and knew about how it would come out.
There was about an hour of dark skies before the moon started rising (it was a couple of days past the full moon). It was partially obstructed by clouds and didn’t really start lighting up the foreground until about an hour and a half into the exposures.
I let the camera run until the batteries ran out.
Post Processing Star Trails Photos
I imported the 864 photos to my computer and just quickly scrolled through them to make sure all was well.
Then using the free Windows software Startrails.de, I stacked all the shots using the faster “Lighten” blend mode to I could review the overall image.
The end result showed a satellite streaking through, that I did not like, as well as breaks and interruptions in the trails themselves at the end of the sequence caused by some thick incoming clouds.
I used a touch-up tool to remove the satellite streak from the 8 or so images it showed up in, and then I worked to identify where the continuity of my star trails was interrupted and how many images I needed to cut.
The periodic thin clouds started rolling in through the night (there were puffier clouds around at sunset too), which eventually gave way to the problematic thick clouds, compelling me to dump the last 170+ shots (around 45 minutes of exposures).
So now that I had identified my usable sequence of images, I added those to Startrails.de along with my one token dark frame (my first time using one) — see this post from Star Circle Academy on the value of dark frames.
And then I used the Lighten-Screen-Blend (LSB) blend mode in Startrails.de, a slower form of processing that minimizes gaps.
I exported the resulting image as a TIFF (higher quality than JPEG), which produced the following image:

From there, I imported the TIFF file into Adobe Lightroom for some additional post-processing.
Post Processing Star Trail Photos in Adobe Lightroom
First of all, I placed a graduated filter over the landscape portion. Within that, I pushed the clarity way up and the sharpness up quite a bit. I wanted the landscape to be sharper and more striking. Clarity really helps with this.
Then, image wide, I bumped up the clarity and vibrance a little bit, my typical first move with these landscape shots. And I pushed the blacks down to darken it up while raising the shadow levels to get some of those details back.
Effectively increasing the contrast. I pushed the whites up a little to brighten up the image and star trails. I pushed the sharpness and luminance up image wide as well.
Lastly, I put another graduated filter across the sky, so I could push up the contrast to make the star trails stand out a little more, and I dropped the temperature just a little bit to get that bluish sky look, instead of the grayish/green.

And with that, I was pretty satisfied with the results of this star trails photo.

Composition of 2nd Star Trails Photo
I was shooting directly out of my campsite at the Tuttle Creek Campground, so I had a limited amount to work with.
I obviously wanted to shoot over the mountains, which was directly west. This had the benefit of giving me that parabolic shape with the stars (as opposed to the circular trails when shooting north).
I tried to include something in the foreground for interest and scale, thus the inclusion of the rocks and bush, but it could have been more compelling with something else… Say, an old dilapidated barn or tent or something.
Keeping in mind the rule of thirds, I kept the landscape in the lower third of the composition and allowed the sky to make up the upper two-thirds of the image since it is obviously the focus of this shot.
I placed Lone Pine Peak slightly off of center.
I think the composition is okay, but nothing extraordinary.

Image with the rule of thirds grid overlay.
Critiques
- I’ve got a few little breaks or fades here and there in the star trails, but I’m not sure what that is due to. Possibly just the wispy clouds.
- I’ve got some blurring in the foreground bush because of the wind shaking it around, unfortunately.
- The image appears somewhat crooked to me because of the landscape sloping up to the right. The shot was level, but the landscape was not. Cropping and straightening caused me to lose certain elements like the base of the rock in the foreground, which I didn’t like.
- There are also a few hot pixels–little white dots–that appear here and there, but I didn’t feel compelled to edit them out.
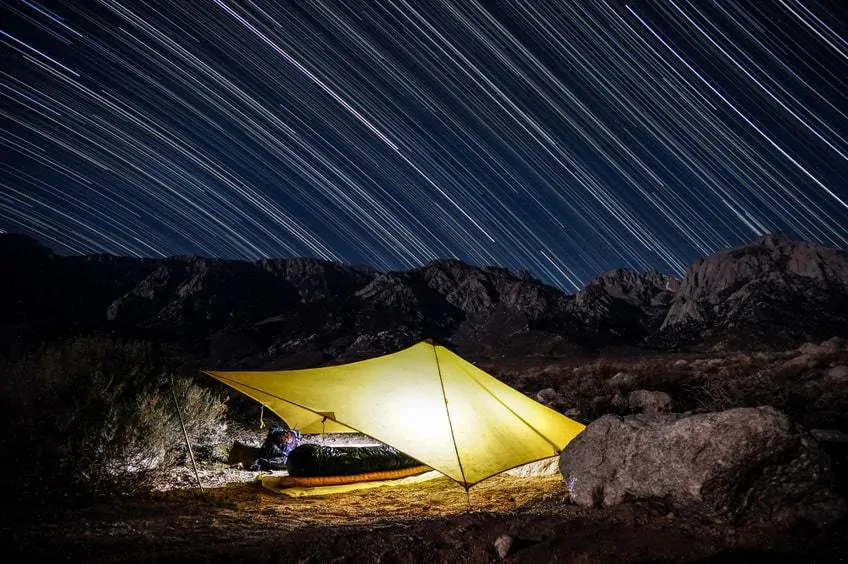
Third Star Trail Photo
A few nights later I decided to give it another go. I wanted to take all the things I had learned from the previous two attempts learning how to take star trail photos and incorporate them here.
I also wanted to include something more interesting in the foreground and scrambled to set up my Mountain Laurel Designs TrailStar before the sun went down. I was here camping, but I was actually camped out in the back of my truck.
Having gotten a better grasp of the camera settings and whatnot from the most recent attempt, my focus now was on how to best position the camera in relation to the TrailStar and how to best light the shelter from within.
I should say that the scene was 100% staged: I wasn’t sleeping in the shelter that night, but I set everything up as if I was, including the ground cloth, sleeping pad, sleeping bag, and even my pack with a few items in it.
I ended up using two lights within the shelter and tried to position them so they were not visible inside the tarp to the camera and that the lighting was relatively even (minimizing harsh lighting lines or shadows).
I went through the same pregame setup detailed for the second shot, then I cleared my memory card and brought the camera back to the truck to fully charge it back up to 100% (instead of 96% or whatever).
I waited a full two hours after sunset for the skies to get completely dark, and to make sure I had enough battery life to catch the moon rise in another two and a half hours–I needed some foreground lighting on the distant peaks.

Click on the image to see a higher quality version.
Before I started the time-lapse sequence, I turned on my lights in the shelter and took a bunch of different shots ranging between 10-second exposures and 25-second exposures.
I wasn’t sure how bright the tarp should be when it would be stacked with hundreds of other images, so I gave myself lots to work with. And then I turned the lights off in the shelter.
I took a couple of dark frames and then started the time-lapse sequence. This time I was running 25-second exposures, at f3.5, and ISO 800 at a 16mm focal length (24mm), which I felt were better for star trails photography settings in terms of quality.
It took some 445 photos over 3 hours and 40 minutes.
Post Processing Star Trails Photo
I followed the some process as detailed above for the second image.
The only difference being I added a gradient filter to my single illuminated tarp shot–I ended up using a 10-second exposure–in order to completely blackout the stars (else it might cause a skip at the start of the trails) before stacking the images in Startrails.de.
I then followed the same post processing sequence… Startrails.de and then into Adobe Lightrooom for some finishing work.
Final Thoughts on How to Take Star Trail Photos
Overall, I am pretty happy with how this last shot came out.
The inclusion of the tarp as a foreground element really makes it pop, particularly the bright yellow color of the TrailStar. And yes, I couldn’t resist the thought of including my TrailStar in a star trails shot… 😀
I’d encourage you all to go out and get into the process of taking night time photos of the stars. They offer a beautiful canvas from which to work and a great deal of room for creativity as you try to determine what else to add to the shot in the foreground for interest.
Additional Star Trails Resources
- Star Trails Academy – lots of great free info on their website
- How to Photograph Star Trails: The Ultimate Guide from Light Stalking – lots of great insight in this one post.
- How to Create Dazzling Star Trail Photos, From Start to Finish Read from Peta Pixel – More info and insight.
- Check out the Sony NEX-6 on Amazon.com – the camera I use as I travel.
If you have any questions or constructive criticism, leave me a comment below, thanks!
Share This
Did you enjoy this hobbyist guide on how to take star trail photos? Please take a second to share it on Pinterest, Facebook, or Twitter. Thanks!
Ryan
Latest posts by Ryan (see all)
- Kazakhstan Food: Exploring Some of its Most Delicious Dishes - August 7, 2023
- A Self-Guided Tour of Kennedy Space Center: 1-Day Itinerary - August 2, 2022
- Fairfield by Marriott Medellin Sabaneta: Affordable and Upscale - July 25, 2022
- One of the Coolest Places to Stay in Clarksdale MS: Travelers Hotel - June 14, 2022
- Space 220 Restaurant: Out-of-This-World Dining at Disney’s EPCOT - May 31, 2022
Comments 5
I have a new Nex 5T and plan to try this. I did it before with a Canon with the chdk allowing me to turn off dark frame subtraction, so that I could avoid gaps between photos. But, I can’t figure out how to do that on the Nex. How did you deal with that?
Author
Within the settings I turned off all the extraneous settings I could find. Namely the high ISO noise reduction and long exposure noise reduction. That will allow it to take shots back to back to back without the lag as it processes them between shots. If not, you will get those gaps in your trails. Does that answer your question? These menu options are available on the 6, though I’m not familiar of what the differences might be with the 5. Let us know, please!
Thanks for the info! I haven’t had a chance to actually test it with photos, but I looked through my menus and both of those are there, so hopefully that will work. Its funny, I actually emailed Sony customer support asking if there was a way to turn off dark frame subtraction for nighttime time lapses and they did not point me to those menus – maybe they didn’t understand what I was asking because I was using a different name for it. I have only had this camera a few weeks and I keep discovering new menu options I didn’t know about. I didn’t realize long exposure noise reduction is the same as dark frame subtraction but now that I think about it it totally makes sense. You have saved my star trails! (most likely.) I’m in a city right now so there’s too much light pollution – I probably won’t be testing it out till I leave the city on break. But I’m very happy to know about those options, since they are really critical for star trails.
On a different topic, I have to let you know that there’s a problem with your website that gets in the way of reading it. When I load it on a computer, I get two popups – one that says something about you, and one that asks me to share with facebook, reddit, etc. On the computer, I can close the one about you, but I can’t close the one about sharing. It blocks some text, but the computer screen is large enough to scroll around it, so its not too big of an issue.
However, on the iPhone, it blocks the entire article and can’t be closed. I also can’t close the one about you because it won’t let me center the page on the x. Its hard to explain, but basically it means your site cannot be read at all on an iPhone. I had to wait till I could get to a computer to read this comment.
Awesome writeup and photos! I am going to have to try your technique. I usually lock the shutter open for star trials or use a high ISO and a 10 to 30 second exposure.
My writeup covers those techniques. you can read it here:
http://liferemotely.com/travel-advice/photography/267-how-to-take-incredible-star-photos-like-nasa
Keep up the great work!
Author
Thanks Kobus! There’s just something that’s so much fun about night photography and uncovering what you can’t quite see with the naked eye. I was in a photography seminar all week, one thing I learned about were these skytracking devices used with telescopes that will follow the movement of a particular group of stars, allowing long exposures without the streaking… Pricey sure. But pretty cool, nonetheless!
It was great connecting with you the other evening! Thanks for all the great info (both in person and from the blog).