
UPDATE: Tragically, on January 30th, 2015 Mark Miller died in a climbing accident in Silverton, Colorado. Mark was a great guy, excellent instructor, and no doubt will be missed by many. My thoughts go out to his friends and family and those that knew him.
“Get me a Korean … any Korean!” That was the eye-catching title of an old article from Reuters that I recently stumbled across. It’s about the world of Olympics archery coaching…

“First they spend months learning the proper stance. Then it’s months learning to raise one arm, then both arms for a couple of months.” Rabska said South Korean archery students continued to practice the most basic elements until they had perfected the technique and bio-mechanics “Those kids have six months intensive training before they shoot their first arrow.” The approach in the West is much more direct. And much less successful.
“You know, practice doesn’t make perfect. Practice makes permanent. The more you practice the wrong things, the more you lay on the hard drive and the harder it is to get rid of it.”
The full article has many interesting insights and anecdotes into the world of training and general sports performance. Many of which obviously have parallels in the climbing world. Some people seem to have natural instincts for a given athletic endeavor.
They can pick up a bat and hit the ball out of the park, and another can pick up an ice tool and seemingly effortlessly climb up a frozen waterfall. Some people may spend years toying around ineffectually, yet picking up little insights here and there that bring about subtle improvements.
And some have spent decades in their craft and have learned the ins and outs from trial and error, and have subsequently been able to convey and translate that knowledge to their peers or students.
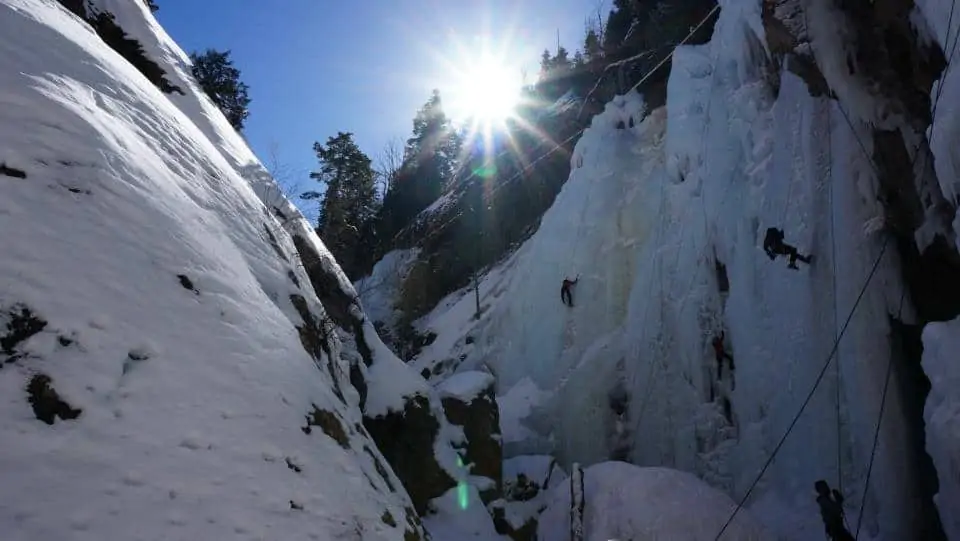
Before heading to Ouray I had only really done a season and a half or so of ice climbing–and on less than a half dozen trips. I had easily climbed more ice in those first few weeks of January in Ouray than I had ever done before.
I understood the fundamentals of proper technique through previous instructional courses and through my own reading and research (that doesn’t mean I always used proper technique, of course). And while I was a better ice climber than I was the year before, I didn’t really feel like I was progressing anymore by the end of January.
It seemed that I had plateaued in my endurance and performance. Perhaps it was due to not incorporating enough rest days (making me weaker over time), or perhaps it was through the compounding effect of poor technique (the “poor practice makes permanent” comment referenced above).
It was with these general concerns that I decided I wanted to get some expert advice in order to improve my ice climbing technique.
Mark Miller with San Juan Mountain Guides
 Living and hanging out with a few local Ouray guides gave me some tremendous insights into the local scene. One name that I kept hearing come up was that of guide Mark Miller with San Juan Mountain Guides.
Mark is one of the original SJMG guides and has been teaching ice climbing instruction in Ouray longer than any other active guide. I heard comments bandied about that he was a wizard and a guru of ice climbing.
“If I’d have hired Mark when I first started ice climbing, I would’ve saved myself a couple seasons worth of effort.”
I heard some pretty high praise of Mark from much better ice climbers than me, so I decided to lay down the money for some professional instruction. After returning from my brief hiatus back to Washington DC (which also served as a nice recovery period), I had a few days back on the ice before I was scheduled for 3 days of 1:1 instruction with Mark Miller.
Total side story: it was also around this time when I had the chance to randomly hang out with the legendary Fred Beckey! You know, just the most prolific alpine climber in, well, the world, I would say… He’s got more first ascents than any other human being.
He’s now 90 years old and is still out there road tripping by himself. Incredible! A couple of us went down to O’Brien’s pub for their 4-6pm Happy Hour (best deal in town!) when a friend brought Fred Beckey in…
Apparently he was at Ouray Mountain Sports asking if he really needed to have chains to drive over the Million Dollar Highway to Silverton. Mind you, it was absolutely dumping outside. Mark (not Mark Miller) encouraged him not to drive over the pass that evening and brought him into O’Brien’s instead. We hung out with Fred for an hour or so listening to his stories, and, at least me, being generally in awe. He ended up crashing on our downstairs neighbor’s couch for the night.
Anyways, back to the story… On a quiet Tuesday morning I met up with Mark at the San Juan office on Ouray’s Main Street, and since it was just me, we were able to quickly take care of paperwork and head up to the Park.
We headed straight to the School Room, one of the closest and most accessible climbing areas, making it ideal for guided and instructional sessions (the School Room is a fitting name). Mark had me hop on a WI4 route, and just asked me to climb up halfway so he could watch my technique and see where I’m at.
From that quick climb he immediately identified areas of improvement and offered some subtle tweaks to achieve them. Straight away he was able to fix the accuracy and swing of my left hand… One helpful trick was to aim your pick, line up your elbow, and then focus on returning the hand to the same location (rather than focusing on the pick), which immediately improved my accuracy.
With the improved accuracy I was then able to focus on elbows in, keeping a loose grip, and getting that proper whipping motion with the tool in my non-dominant left hand.
We then worked on improving foot technique. Standing on the ground and raising the toes up to feel the front shin muscles engaging–then translating that same shin engagement to the kicks on the ice. And also utilizing the hips and inertia more while placing your feet… Meaning that while kicking in, you should swing your hip out away from the ice and kick in during the swing back into the ice.
We even practiced an exaggerated version where I would swing out and audibly had to count to three before kicking into the ice. This technique is utilized during the “Monkey Hang” or “A Formation” or Triangle Formation–whichever you prefer to call it.
This is the preferred modern style of efficiently climbing steep ice, as opposed to the old “X Formation” of climbing whereby you kick-kick-swing-swing with tools and feet placed side by side. With the “A Formation” you instead swing-kick-kick, and place one tool over the top of the other.
I had already been using the A Formation, so now the focus with Mark was to just achieve subtle improvements and refinements. If you are unfamiliar with X vs A technique, check out Will Gadd’s post here, or this great UKClimbing article.
This video also includes a good visual demonstration of the technique:
Literally before noon, I had been given remarkable insight into my technique as it stood when going into the class, and had been given the tangible steps needed to improve upon it. It’s amazing that he can be belaying you across the canyon, and will see the most minute subtleties in your technique as to why it did or didn’t work effectively…
“See how your tool deflected right there?”
“Try rotating your left foot two inches that way…”
“You feel how you’re out of balance during that swing?”
He is able to verbalize and pick up on things that you may or may not be aware of, even though you are the one doing the climbing.
In the afternoon we continued further down the rabbit hole of different techniques and breaking down the elements of technique. We worked on swinging off to the side for side pulls, flagging your foot and getting your hips into the wall, dramatically extending your reach to pass small bulges.
We worked on how to climb small pillars by using opposing feet/arms on pillar, then wrapping your opposing leg around the back up high for support/stability. Those are just a few of the small technique tips and tricks that we worked on that afternoon.
Learning to Identify Rest Stances
One of the biggest things I took away from that day was our work on REALLY reading the ice to identify rest stances. Not just “okay, climb up for 40 feet to that big ledge, take a break, then climb the remaining 40 feet”. But to identify the subtle features that would allow one to take real rests or even partial rests.
We would break the climbs down into 5-10 foot segments and I would have to take rests, whether tired or not. Finding the little sloping bulges where you could get full foot contact–where you could get your heel and skeletal structure into each rest, and utilizing your opposite arm from your resting foot for balance.
One of my weaknesses prior to this was just thinking that I wasn’t strong enough or had enough endurance or whatever to tackle longer ice climbs since I’d always pump out. But really I just haven’t been utilizing the microrests at all.
It’s easier to climb 10, 10 foot sections of ice, then to flash through 100 feet. I just needed to break it up more. I was amazed at how helpful this exercise was. Mark would say that he wasn’t a particularly strong ice climber, but he could rest on just about anything, and that allowed him to climb the big and the gnarly routes.
It helps a lot to be able to get off your front points, particularly when you begin to think about screw placements. You can read the ice to identify rests, and then work the swing locations backward from there to gain efficiency of movement. Interestingly, tool length is about the length of your shin from foot to knee.
You want to move about one tool length distance each swing, then monkey hang and work your feet up to about your previous knee height. Stand up and then repeat.
Steep and Funky Ice
The following day we worked on steep and gnarly climbing… Climbing some of the uniquely Ouray-style ice climbs which become super picked out, which then become accentuated over time and you have to navigate up and through strange bulges and cauliflower blooms.
We headed to the Scottish Gullies to work on some of those gnarly WI4s and 5s. This is the time where more of the fun movement techniques of rock climbing come into play–when you are climbing below a certain threshold, ice climbing is pretty straight forward, repeating the basic elements…
Swing-Kick-Kick, keep going up! But when you get into climbing the strange and hard you find there is flagging and heel hooking and toe hooking, rotating on crampon points and other fun things.
There is less swinging–mostly hooking strange and unusual features. Mark had me give the route a go, and after becoming a little stumped/tired I lowered off where he demonstrated some of the techniques used to surmount the more unusual features. He makes it look so simple, easy, and even graceful. Climbing this type of ice is his personal favorite, just for the fun movement it offers.
I gave it another go, trying to incorporate his techniques. It was easier, but still not easy, of course. We continued working on those movement elements through the morning and things started to flow together a little better.
Moving from one hip in, to the other hip in–finding the fluidity of movement between moves. More like dancing on ice and navigating through the cauliflower fields, if you will. It was challenging, fun climbing. And after a few laps on a few hard and gnarly routes, we dialed things back a little bit and refocused on cementing in the fundamentals learned from the previous day.
Going one-on-one with a guide/instructor is an invaluable experience, but one of the drawbacks is that you are doing all the climbing! Doesn’t sound like a bad deal, but you realize that without the normal swapping of the belays and various rests that you normally associate with a day at the crag, you can easily wipe yourself far earlier than you normally would.
Pick o’ the Vic
The third and final day saw us head straight to the Upper Bridge to hop on one of the “big boy climbs” that I had mentioned as a goal at the beginning of the course.
I wanted to hop on Pick o’ the Vic, probably the most classic climb in the park. A steep and sustained 40-meter, WI4 climb that you get a prime view of from the bridge. I had been looking at that line in awe since arriving, but was too intimidated by it to give it a try… You get lowered in from the top, and then pretty much have to climb your way back out.
I was tired and fatigued from the previous two hard days of climbing with Mark and here I was about to be lowered in first thing in the morning–this would be my warm up climb. Hope I can get back out!
While getting lowered down you just keep watching the ice go past. It’s a long ways down there and it certainly feels like it. There was no one else around. Just the cold calm stillness of the box canyon floor. 120+ feet of vertical ice above. “You’re on belay!” “Climbing!”
Swing-Kick-Kick. I focused on all I had learned the previous two days and attempted to implement it into each swing, each kick. The ice was all fresh–I had the first run of the day so it wasn’t yet picked out from previous climbers.
I started making progress on the route, the bottom of the canyon began to recede below me, and I focused on moving from one little rest spot to another–identifying the next one before I started climbing again.
A little over halfway up the route and the freshly sprayed ice was beginning to prove problematic–there was a tremendous amount of chandelier ice which has always proved difficult for me, perhaps psychologically as much as physically.
You swing through and shatter large amounts of ice, burying your tool back into these vertically oriented pillars of ice. The purchase of the tools doesn’t feel as strong, and indeed some of my placements sheared out of the ice and cut loose.
I found a decent, albeit wet rest spot to try and recompose myself. Eventually I manage to get through the worst of the chandeliering and make way onto easier ground and then start topping out. Pick o’ the Vic certainly wasn’t easy for me, and I sat on the rope once or twice when my tools busted out. But I was glad to get on that classic route, and happy that I was able to make it up.
Mock Leading
Mark offered to lower me down for another go–but I was tired and ready to head for easier ground. We went back to the School Room just adjacent to the Upper Bridge and shifted gears a little bit to talk about leading ice, multipitch ice strategies, ice anchors, screws, and so forth.
One quick tip I picked up from Mark that I hadn’t heard previously was the virtues of the untied cordelette… I’ve always kept my cordelette as a closed system, tied together with a double Fisherman’s or a Flemish Bend. That’s what I usually always see done by my fellow climbers.
But Mark preferred to leave his untied. You clip the cordelette through your anchor points, draw the middle(s) down like usual, fold the tails behind where you want to tie the masterpoint, then just tie an overhand. There are a number of advantages that he went into, but chief among them is the ability to quickly and easily tie the masterpoint exactly where you want it to be, no fussing with extra wraps or things like that. An interesting idea that I’ve begun utilizing since that time.
In the School Room I started doing a few mock leads and then having Mark go up and clean the screws and evaluate my placements. It was a valuable exercise to have such an experienced eye take a hard look at my placements and provide constructive feedback.
It certainly provided me with a great deal more confidence in my ability to pick screw placements and was helpful in fine tuning my perspective on what improvements could be made.
In Conclusion
The whole experience with Mark Miller was pretty amazing. He definitely lives up to his hype and if you climb with him you will very quickly realize why he is one of the most requested guides at San Juan Mountain Guides.
My biggest regret is that I didn’t climb with him earlier in the season… I could have probably reduced some of the bad form in the practice makes permanent mantra and have jumped started my climbing for the weeks ahead.
My other slight regret is doing three days of one-on-one all in a row–if you are just on your own, it’s almost a little too much! It might have been better to just do two days, or perhaps even tried to book a more intermittent schedule (if possible) which incorporated a rest day here or there.
The feedback and insight I got from him goes far beyond what I could possibly replicate in written form here, unfortunately. Much of it is just based on such personalized feedback that it would be impossible to convey.
It was difficult enough to verbalize in this trip report some of the movement and techniques that he conveyed–so I just want to note that we did go much further down the rabbit hole than this write up might have led on.
I cannot recommend climbing with Mark enough if you have the opportunity to do so, he will undoubtedly make you a better climber. I know his winters are extremely busy, so contact San Juan Mountain Guides to schedule your dates!
As far as reading more about ice climbing technique, I’d encourage you to check out Will Gadd’s blog–one of the most experienced ice climbers in the world.
He’s also got a pretty good and readable book, Ice & Mixed Climbing: Modern Technique, that I’d encourage you to read.
But to quote Kel Rossiter, reading a cookbook gets you no closer to dinner and reading a diet book gets you no closer to thinner! So read the materials, understand it intellectually, but then get out with someone far more experienced than you to give you solid feedback.
Disclosure: I sought out and received a discount (they offered 10%) from SJMG for signing up for both the Ice Leader’s Course and the Private Guided Days and for offering to write up a trip report on my blog. I have no reason to believe that Mark Miller was aware of the discount, nor that it would have affected his curriculum or delivery. I was just looking to save some money.
Ryan
Latest posts by Ryan (see all)
- Kazakhstan Food: Exploring Some of its Most Delicious Dishes - August 7, 2023
- A Self-Guided Tour of Kennedy Space Center: 1-Day Itinerary - August 2, 2022
- Fairfield by Marriott Medellin Sabaneta: Affordable and Upscale - July 25, 2022
- One of the Coolest Places to Stay in Clarksdale MS: Travelers Hotel - June 14, 2022
- Space 220 Restaurant: Out-of-This-World Dining at Disney’s EPCOT - May 31, 2022
Comments 1
I had the good fortune to take a technique seminar with Mark several years ago at the festival. It was some of the best physical instruction I’ve ever had. I spent 6 years training in judo with a 2x Olympian so I know good instruction when I see it.
I only learned some very basic footwork but I still use it to this day and haven’t run into any other instructors who use the same footwork pattern that Mark taught. Such a tragic loss that he’s gone.