
I started my travel blog for the primary purpose of holding myself accountable, but I also wanted the blog to not be totally amateur hour and I wanted to keep the door open to future growth and new possibilities, all of which I will clarify shortly.
In this article we are going to talk step-by-step about how to start your travel blog in less than 24 hours, some of the choices you will have to make in the process, things you should consider to not inadvertently shut any doors to future growth, and how to put your best foot in terms of making this into a profitable and long-term business., which is the most fundamental pillar in terms of being able to travel forever, or at least have the freedom that it entails.
The goal here is to teach you how to start a travel blog that is: 1) a fun and creative release for you, 2) creates a new and profitable source of income for you, and 3) that helps hundreds and then thousands of other travelers around the world (and around the clock while you are sleeping).
That’s the power of creating an adventure travel blog!
Travel Diary or Travel Blog?
“Dear Diary, a blog doesn’t need to be anything more than a simple personal journal…”
If that’s all you want, then you don’t need anything fancy. You can go to WordPress.com, Blogspot.com, Tumblr.com or any number of other websites and start a quick, easy, and free travel blog. If your only goal is to share updates with friends and family, and you have absolutely ZERO aspirations of something beyond a personal journal then that is what you should do.
Simple — no need to keep reading this article!
If, however, you have an interest in turning your travel passion into a travel business and want to start making money with your travel blog, then we’re going to be talking about how to best go about it.
If you want to start a travel blog that will eventually serve as a business, then you are going to have to invest a little money upfront. Free is NOT going to cut it. Fortunately, you can get it all done for less than $200 or so, and that cost will be good for the first few years.
To clarify: in order to reap some of the benefits I talked about in the 7 Reasons to Start a Travel Blog post, you don’t have to do anything beyond a simple free journal site as mentioned above… IE you can still hold yourself accountable, connect with a like-minded community, clarify your thoughts, and more.
But, as we’ll get into, I think you can do all of those things better by taking your new travel blog a little more seriously.
Or, at the least, you won’t be closing the door on future opportunities.
Which leads nicely into our next point…
What is Your Motivation?
Most importantly, you should define why you are starting a blog, what exactly you hope to get out of it and what your goals are. Knowing your reasons WHY can help you make the best choices when you consider HOW to go forward.
- Do you hope to make some money from it?
- Do you want to be taken seriously as an influencer or leader in your niche?
- Do you hope to receive free travel products or go on press trips?
- What is your niche?
- What topics do you plan on writing about?
- Is it simply a passion project, a side hustle, or would you like to go full-time?
Knowing your reasons for doing this will help you define just about everything that comes ahead, it will also be the thing that pushes you forward to do this work when almost NO ONE is reading what you are writing, and when you aren’t making any money in the beginning.
Create a long-term vision or goal… This travel blog business is NOT the road to fast riches. You will not be able to pay for all your travels with the blog income within the first few years, so this should be a long-term goal that you are willing to work on for quite some time.
1. Pick Your Travel Blog’s Name and Domain
The domain name, which is basically your address on the Internet and how everyone comes to find you, is not a requirement to start a blog (you can use a free sub-domain like those on WordPress or Blogspot).
But it is something that I would argue should be a requirement, regardless of how “serious” you plan to get with your site.
A domain name lends a great deal of credibility to any website… I mean, www.desktodirtbag.com is my brand, my home, my little piece of Internet real estate. It just isn’t the same as telling people to find me with a sub-domain at https://desktodirtbag.wordpress.com.
(But you should scoop up those subdomains related to you remain domain as well — that sub-domain link actually works)
Having a sub-domain based website screams amateur hour straight away. When you are searching Google for information on any subject, you are most likely to see and trust websites with a proper domain name (even if you haven’t heard of them before).
Additionally, I think buying your own domain name provides an important psychological boost in how YOU look at YOUR OWN website. You’ll have just invested a little bit of money to get it, you’ll feel more professional and take it more seriously. You’ve even got your own YOURNAME@YOURWEBSITE.COM email address, and hey you don’t want to buy something like a domain name and let it sit there totally unused.
The least you can do is buy a domain name. It’s only about $10 (or even free with some hosting packages). If you can’t bother enough to take yourself seriously, who else is going to?
I have used Namecheap.com for my domain name purchases but there is a myriad of options out there. Namecheap has been great to work with, but all the sites basically have the same prices and same level of service.
SAVE $10: You can even get a FREE domain if you get your hosting through Bluehost (more on hosting in the next step).
Considerations When Choosing a Domain Name
Choosing a domain name is the first real concrete step, and it is fairly important to think about a few different things when choosing your travel blog name:
Do It Right, Now
You want to get it right the first time! You don’t want to end up unhappy with your name down the road and have to change it and lose whatever backlinks and work you put into getting them.
Easy to Say
Be sure to choose something that is easy to spell and remember, that isn’t too long, doesn’t contain any hyphens, and has a standard .com ending.
Without a doubt, www.bobthetraveler.com is much cleaner and easier to remember when compared to www.bob-the-traveler.info…
You should always test out a potential domain name by saying it ALOUD:
“Check out my website at bob dash the dash traveler dot info.”
Don’t forget that word of mouth is the best form of advertising, especially in the beginning.
Top Tips: think short and memorable, avoid the use of numbers, punctuation, or even alternative domain endings that are NOT .com at the end.
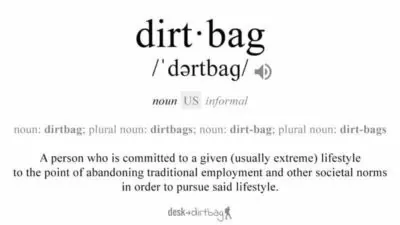
Even my website when said out loud can cause some confusion “desk to dirtbag” like is that the number 2?
Keyword or Branding
Consider whether to create a name based on keyword or branding. If you’re only blogging about travel, it can certainly help you in Google’s organic search results to have the word travel somewhere in the domain name, at least early on, and also provides a clear idea of what the site is about to readers.
You don’t need to include a keyword though, as you can go for a brand image… Think Google.com, Uber.com, Kayak.com, Amazon.com or virtually any major business out there.
If you time-traveled to the present from the past you would have no idea what those websites are about. Yet we all know exactly what each of those sites are. That is branding. Most will say that naming from a branding perspective is a more strategic long-term approach.
Name Limitations
Also consider the potential limitations of your domain name. Your name should probably be specific, memorable, and maybe even descriptive of the main focus. For example, desktodirtbag.com is a pretty good brand name, but if I ever wanted to shift focus to luxury travel, five-star hotels, and so forth, I am NOT likely to be able to find work like that with the word dirtbag right in the title.
That’s not a bad thing necessarily, but it is something you should think about when choosing a name.
Others have chosen domain names related to their age or being newlyweds or a geographic area, but just think about how that might limit things as time goes on and how that name may age with time.
Once you’ve got your heart set on a name, head over to Namecheckr to do a quick search of your new brand name to determine whether the domain is available (as well as the main social media platforms) and then scoop it up!
Remember, you can get a free domain name by starting your travel blog with Bluehost, and you can also get started with hosting, even if you haven’t settled on the name yet, allowing you to buy the domain later on.
Travel Blog Name Ideas
You should look to existing travel blogs as you generate your list or brainstorm of travel blog name ideas because for 1) they can help inspire you in terms of finding the perfect name for you, and 2) they can help you AVOID looking like a copycat by inadvertently naming your blog with a similar brand name or similar words. Here are a few of the top travel blogs out there…
Nomadic Matt
The Blonde Abroad
Adventurous Kate
Wandering Earl
Hippie In Heels
Expert Vagabond
The Planet D
Anna Everywhere
Y Travel Blog
The Broke Backpacker
Getting Stamped
Travel Freak
Be My Travel Muse
A Dangerous Business
Finding the Universe
Goats On The Road
Johnny Jet
The Savvy Backpacker
Nomad Revelations
Miles To Memories
The World Pursuit
Nerd Nomads
Make Time to See the World
Independent Travel Cats
Will Fly For Food
Nomadasaurus
Travel Mamas
Indie Traveller
So be sure to avoid similar sounding names… And definitely, don’t use a name structure like Nomadic {Your Name}, Wandering {Your Name}, Adventurous {Your Name}, as those are some of the biggest names in the biz. You should also consider that from a long-term branding perspective, it may make more sense to not even include your name at all if you want to open up content creation beyond yourself.
You’ve got a name, now it’s time to decide what platform to launch your blog on…
3. Choose a Blogging Platform
In order to launch your travel blog, you will need some sort of backend that is turning your words into a pretty website. Again, there are many options from WordPress, Joomla, Blogspot, Wix, Tumblr, Squarespace, and more.
Let’s just cut to the chase: WordPress, that’s what you want.
It’s the biggest and most widely used out there. Millions of websites use WordPress as their backbone, including countless websites that don’t appear to be blogs at all but are storefronts, news sites, or just a simple 2-5 page business website. Its popularity means that there are a huge number of resources when you need help when you need themes, plugins, or anything really.
This is one thing that I don’t think is debatable. You will regret starting your site on Blogger.com and it will be a pain when (not if) you want to move it over to WordPress. I’ve done it for freelance work, please save the headache and start off on the right foot. Likewise, avoid starting your site with all-in-one platforms like Squarespace or Wix where functionality is limited and it becomes complicated if you want to monetize your site.
So WordPress, huh? The question then becomes…
Self-Hosted or WordPress.com
WordPress is the backbone that will run your website. You’ve got two options when making the decision now: use hosting at WordPress.com with essentially the same backbone or pay a provider to host your WordPress.
You may instantly be saying “Free, of course!” but that is a mistake:
- Like we talked about before for domain names, investing just a little bit of your own money will ensure that you take your website and new endeavor more seriously.
- While WordPress.com is free, in exchange they seriously handicap much of its functionality. You cannot install plugins, you are hindered if you want to monetize your blog, they even make it difficult to put in an email subscriber box. Furthermore, even to use a domain name you will have to pay a small monthly fee, otherwise, you are just stuck with a subdomain.
Going for WordPress.com is an extremely compromised experience that will keep you from fully realizing your blog’s potential. No question.
So again, the question you really need to address is what the goals of your website are and what you hope the future holds for it. If it is anything at all beyond a platform to voice your personal thoughts then you should strongly consider starting with a self-hosted WordPress account. You are reading this article because you want to turn your travel passions into a future profit, which means starting your travel blog business off on the right foot with self-hosted.
Moving from WordPress.com to self-hosted once you’ve reached the point where you want to grow beyond, monetize, and take your site to the next level is a HUGE pain. I started directly with self-hosting for this site because I knew better from research, but I have done the transition for freelance clients, and it isn’t fun and not always easy… That’s why they paid me to do it.
Shared hosting plans can be had for just a few dollars per month (it all depends on how long you purchase your hosting for in advance). I just purchased a one-year hosting plan to start, which was enough for me in case I didn’t stick with blogging. But I could have saved money by purchasing a few years in advance.
There are a number of providers that offer cheap shared hosting plans but Bluehost is the number one hosting for new travel bloggers… Why? Because they are cheap, dependable, and should be more than good enough for the first few years of your blogging career.
I used shared hosting for this website when I first started and that’s what I’d recommend to anyone just getting started. Once your website grows bigger, you may find it more advantageous to switch to another host, which is why I eventually moved to the superior shared hosting at SiteGround after a few years.
So you’ve got your domain name and your hosting service set up… What’s next?
Action Step: Sign Up with Bluehost
Install WordPress with One-Click
So, the next step for getting your travel blog up and running is to actually install the backbone to your website, WordPress.
As we talked about there are a number of other options available to you, but there’s no real reason NOT to use WordPress and there are a dozen or so reasons why you should be using it, so let’s just get it installed.
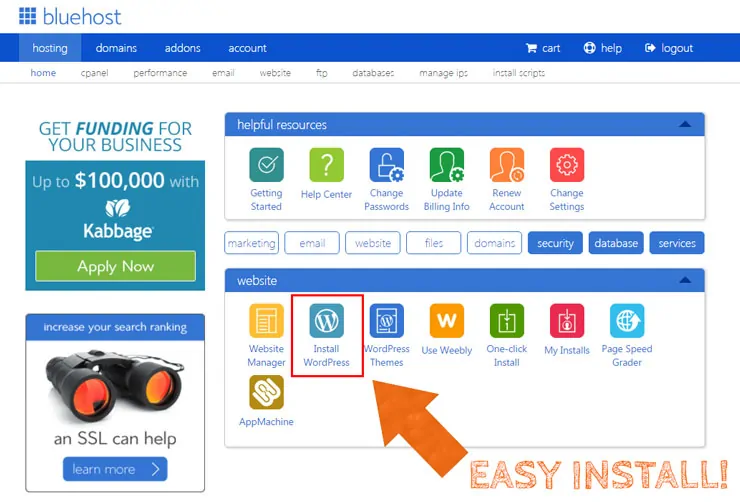
Thankfully, BlueHost and any other good shared hosting service make it ridiculously easy to install WordPress.
You’ll just go to my.bluehost.com and upon logging in you will be taken to your cPanel. Select WordPress and fill in the user information that you would like to use to access the site. Within a few clicks in the marketplace, you’ll have gotten your new website all ready to go.
How exciting! I love that new website smell. BlueHost will also send you an email in a second confirming that the install was successful and reiterate your username along with providing you an automatically generated password.
To access the dashboard for your website (where you log in to work on your website itself, not the BlueHost dashboard), you will go to www.yourwebsitehere.com/wp-admin/ where you will be prompted to enter the username and the generated password. Be sure to change your password upon logging in, and don’t forget to write down your login information so you can get back into your website dashboard.
There you have it! Your website is effectively ready to go…
Learn How to Use WordPress
The beauty of WordPress is that once installed it takes all the technical difficulties of managing a website and code out of the picture and allows you to focus on what really matters: the content.
You can hover over Posts and click on Add New to get started right away with your first article.
It has a visual and intuitive interface that you probably already know how to manage… The little chain means to add a link, you can change the text font and style easily, and add pictures by clicking on the little picture icon. It is all fairly intuitive but you should take a few moments to poke around in the backend and get a feel for it.
It is beyond the scope of this article to explain HOW to use WordPress, but I would recommend checking out the solid and totally free video course from WPBeginner if you need more help with this aspect. You can also find lots of information about how to use WordPress with a quick Google search on any question you might have.
5. Choose a Theme and Design Your Blog
The default WordPress install is not customized whatsoever for your website and is completely generic and maybe even a little ugly.
Thankfully with WordPress, there are thousands and thousands of themes available which you can upload that will completely change the layout and design of your site and visually improve it by leaps and bounds.
Choosing an appropriate theme for you is something you should do right after installing WordPress, so you can then tweak things as necessary instead of doing it twice if you decide to change your theme in a month.
This is the last really BIG step that comes with launching a new blog, and it is also one of the most fun… Time to choose a theme for your travel blog.
As with every step we’ve talked about up to this point: you can either choose a free theme or find a more professional premium theme.
Again, I went with a premium theme right away because I feel like if you’re gonna do something you might as well do it right. In turn, I received a number of comments from friends that mentioned my site was the slickest dirtbag travel blog they’ve ever seen.
There are a few decent free themes out there, so if your budget is tight you can do that, but as with anything else, you pretty much get what you pay for, and free isn’t going to be the best.
Many free themes are not fully optimized for a few important things like Responsive design (changing the layout based on the device the person is using from a cell phone, laptop, or iPad) and they aren’t fully optimized from an SEO perspective (how Google finds your website).
I’ve worked for freelance clients that used free themes for their websites and I can’t help but think why they didn’t bother to invest the $40-60 for something better? They are a business after all, and that’s how you should be thinking as well.
With a small investment you can do better than them, and it helps to think about your site as a business from the get-go.
You have more options when it comes to customizing the designs of most premium themes, they have better features built in, and they offer technical support if you ever have problems or questions that need to be resolved (good luck if you go with a free theme).
Another key reason why I decided to purchases a premium theme right away was to differentiate myself from all the other sites. The few really good free themes out there are used in many thousands of websites (or more!) and I didn’t want my site to look like so many other cheap sites. I wanted something that would be professional and at least keep the door open to working with brands or companies when it comes to free gear to review or sponsored trips (aka free travel to write about it).
If you can’t spare the $50 and want to go free just Google “Best free WordPress themes” and you’ll get a slew of results.
If you’re looking to purchase something there are tons of choices available. I just went to ThemeForest.com and browsed through the top choices until something caught my eye. I ended up going with the Big Feature theme in the beginning. I liked it, though after three years I figured it was time for a change, so I implemented X-Theme, which I use now and still love.
Make a Travel Blog Logo
You don’t totally need a fancy travel blog logo from the get go… Indeed, you can just do a text-based logo with the name of your website to start. If you don’t know your way around Photoshop, the easiest way to get a free logo would be to head to Canva and create a logo… They’ve got free templates that you can easily modify.
Next step up would be hiring a cheap designer on Fiverr who can create a quick and simple logo for about $5.
Finally, you could hire a graphic designer on UpWork (costs vary) or at the higher end of the spectrum, you could use 99 Designs where various designers will submit different options for your logo and you get to pick the best one, which will cost you between $50-100.
6. Install Plugins for Functionality
One of the beautiful things about a self-hosted WordPress backend is all of the functionality that you can add to your website with easy to use (and often free) plugins that can be installed.
When you are just getting started, there are a few free WordPress plugins that I recommend installing straight away:
Akismet Anti-Spam – This plugin will help block the never-ending stream of spam comments on the internet. It really helps!
Classic Editor – WordPress now uses an interface called Gutenberg which allows you to edit your website in “Blocks” and I’m not a big fan. Installing the Classic Editor will give you an intuitive and fast interface like you’re used to. Check out both and decide for yourself at least.
Contact Form 7 – A simple way to build contact forms so that readers or businesses might be able to get in contact with you without having to put your email address out there directly (and which often gets picked up by robot spam crawlers).
Editorial Calendar – Start planning ahead and sticking to your own self imposed editorial deadlines with this handy calendar that allows you to see everything coming up at a glance and drag and drop posts for an optimal schedule.
Fancier Author Box – This is a better way to show your author box at the bottom of each post, allowing you to include a bio of course, but also social media links and the latest posts.
Google Analytics Dashboard for WP (GADWP) – Google Analytics is the standard for tracking statistics and other important data. You will want to sign up for Google Analytics asap, and then use this plugin to install the tracking code and have access to data right in WordPress.
Instagram Feed – Beautiful photos are part of any travel bloggers repertoire and Instagram is the best way to feature them. This will allow you to easily display your latest IG posts anywhere on your website (like in the footer or sidebar).
Jetpack – Jetpack offers up a whole slew of features that are useful to many beginning travel bloggers, whether it is stats (still use Google Analytics though), related posts, automated social media posting, site optimization settings, and security features as well. I used this plugin for years!
W3 Total Cache – This plugin will cache parts of your website ensuring that visitors will be able to visit a much faster loading page.
Yoast SEO – Search Engine Optimization or SEO is creating content that will be able to be easily processed and understood by sites like Google and which will bring you traffic. This is the best SEO plugin and will help ensure you start off with SEO in mind and are properly optimizing.
7. Create Your Essential Pages
The traditional structure of a blog is where the main page (aka the domain address) displays the latest posts along with a small excerpt. One of your first steps should be to change your homepage to a static page (done in the settings) so you can display some important information about the message of your website, most important content, have a place for users to subscribe with their email address, etc.
Take a look at any major travel blogger (and almost any other website for that matter)… They are using their homepage to display the most important information rather than just the latest posts.
For now, create a new PAGE (not post) with your static homepage, you can include a small synopsis of your travels, yourself, what readers can expect, etc. You should try to convey your niche and angle here.
Once you’ve got a decent version, go ahead and make it live and change your settings to a static homepage. You can continuously revise and change this page going forward.
From there, you’re going to want to create a few other essential pages for your website, like:
- About: I’m sure you can imagine what your about page is all about! Here you’ll write in more detail about yourself, where you’ve been, what you’ve got planned, and most importantly, how your site will be helping readers.
- Work With Me/Us: A place to pitch any freelance services you might have to offer (a travel blog can act as a great portfolio for freelance work, which is the best way to earn money on the side as you start), and can also address what type of work you could do for clients. At some point, you will want to create a Media Kit for inclusion here.
- Contact: Your contact page is the place where you can use that email form plugin we talked about so that businesses and readers can reach out to you.
- Follow: Your follow page can compile links to all of your social media profiles and include a newsletter sign up form as soon as you have gotten setup (which should be ASAP and before any public launch).
Those are just a few ideas of the most basic pages you will want to include, others could be a Travel Resources page, Start Here page, Travel Destinations page, etc.
You should think about these sorts of pages as the items that you will be adding to your navigation menu, the most important parts where you can quickly and easily direct readers from any page on your site.
8. Develop a Content Strategy
Developing a content strategy sounds like an intimidating prospect, but it is just a fancy way of saying that you should come up with a plan in terms of what you are writing about and when. Even years into this, I don’t have big long term plans for a content strategy, so don’t be overwhelmed.
Prior to launching your travel blog publicly (meaning telling friends and family), you should plan to have at least 5-10 articles live on your website (along with the pages discussed above). That way anyone who comes across your site will have more to read if they like and it won’t seem like a ghost town.
After getting that initial section of articles live, you should also come up with your own editorial calendar in terms of when you will publish new content and how often. If you are busy, working full time, etc, you may just want to start with having a once a week deadline every Monday, for instance.
Keep that up for a few months and then bump it up to twice per week. Resist the temptation to set something too aggressive that will be hard to follow through with. In my experience, it is better to have a few weeks of posts ready to go, scheduled on my editorial calendar than to constantly be scrambling.
What can you write about if you aren’t traveling?
Honestly, it is easiest to write and publish consistently when you are NOT traveling and don’t have the constant distraction of the new and unknown. Take advantage of the fact that you aren’t traveling by writing about your previous trips, about anything you know in your local city, region, state, etc (just because you aren’t a tourist there, doesn’t mean that others aren’t, and in this case you would be a local expert). You can also write about any trip planning you are doing or struggles you may be having as it relates to travel.
How do you decide what to write about?
While SEO will be important, I think it is best in the beginning to focus more on developing the writing habit and identifying all the subjects you could write about and all of their possible derivations. Let’s say you want to write about a recent city you visited or the local big city you know best…
Don’t stop at one article! You can plan a handful of different angles for any ONE destination. Things to do, where to stay, outdoor activities, places to eat, coffee shops, etc, etc. The number of things you can write about is almost endless… Even for that monster “things to do article” you could then write a whole series of shorter articles about each individual point.
Build Content Trees or Clusters
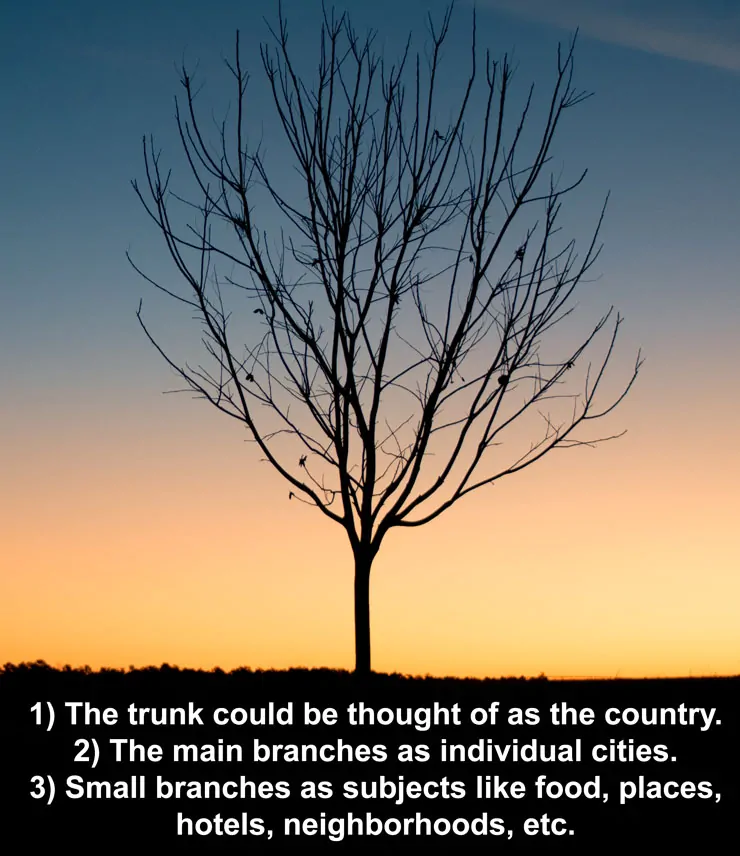
I like to think about my content planning as planting trees… In the beginning, they may be small and weak, but they grow and branch out and become powerful. Identify the trunk content, like your local state or region which may have its own page (eventually). Every supporting content and angle will link back to this trunk content and shore it up (these are the branches), and other related tertiary content may link back to those branches.
Eventually, you will have enough for a strong trunk which you can put together as a standalone guide on a place that also links back to all those secondary articles.
Your trees will eventually get bigger and bigger… Let’s say your original trunk was Colombia and you built tons of branches to support it. Then you did the same with Peru… Now both of those original trunk articles might go on to support a new South America page.
Focus on building content clusters that resemble trees and which are connected and grow from the same root, creating a strong overall structure.
Identifying a few different main trees that you want to “plant” can also help you identify the sort of content you will be linking out to from your main page or in your main menu — in these cases you would link out to the tree trunk and then the reader could continue delving further into their area of interest.
9. Network and Learn
Networking and education are an essential part of any business, and that goes for starting a travel blog as well. Honestly, blogging can be a pretty solitary and lonely type of job which is why it is important to branch out, network, and learn. It will get you in touch with people going through similar struggles and give you people to chat with, just like any other job where you can trade war stories, lessons learned, or just hang out around the virtual water cooler.
Online Groups
There are tons of different Facebook groups focused on blogging or travel blogging, so just head over there and punch that into the search bar to join some groups. You can start by just lurking and learning from other conversations, questions, and responses. It is super helpful.
Travel Blogging Course
Another excellent resource is to join the Superstar Blogging course put on by Nomadic Matt (the largest travel blogger out there). Not only do you get access to a pretty amazing course about travel blogging and the business aspects, but you get to join an awesome private Facebook community. It’s like those I mentioned previously but seems to have a higher level of engagement and also includes things like being able to tune into Nomadic Matt’s live office hours to ask him questions directly.
If you’re at the beginning stages of your blogging journey, it is absolutely perfect because there are tons of people in the same boat and the content, group, and info tend to skew towards total beginners rather than intermediate or advanced bloggers.
Travel Conferences
Virtual interactions will only take you so far… It is a whole new experience to take that learning and those relationships offline. The best way to do that is through a conference that has all sorts of sessions or talks that are relevant to you, networking with fellow bloggers or online entrepreneurs, and even allows you to travel to a new place and explore! It’s a win-win-win.
The two main travel conferences are:
You can also learn a lot from conferences that are specifically within the travel niche, but speak to the wider world of blogging or online business, like:
As soon as you can justify the expense of attending an in-person conference, it is something you should definitely do! The face-to-face connections you make with brands and other bloggers are huge, the amount of actionable learning and inspiration can be game changers.
10. Start Making Money with Your Blog
Ah yes, the big one! I’m of the mindset that you should be thinking about your blog as a business from the get-go and that ultimately means trying to make money. Now there may be some aspects that are difficult to undertake right away, and your main focus should be creating content and building an audience which you can eventually monetize, but that doesn’t mean you shouldn’t be thinking about opportunities early on.
If you are talking about a specific piece of gear in a review, then by all means you should plug in an affiliate link. You should NOT sell your soul for a free piece of gear or a free trip, because you can destroy your credibility in an instant by chasing a buck.
First you must think about how you can serve and help your audience (remember the What’s In It For Me? part when you write) and later the money will follow as you increase your reach and become more adept… For more details, you can read my article about the truth of how I get paid to travel the world which shares all my main sources of income as well as a number of other sources popular with other bloggers. Check it out to get the wheels turning for your future blogging empire.
So What’s Next?
The learning and modification phase never really ends. I am constantly tweaking and improving on aspects of my site as well as learning new things. It is an ongoing process, but it is so rewarding to watch your little travel blog grow into something bigger.
Even though I invested in parts of my website in order to give it the best foot forward, there were other things that I didn’t do right away which would have helped me immensely. If you haven’t yet, I’d encourage you to sign up for my free Travel Blog Blueprint course which will take you through the many stages of building a blog from the why, how, and ultimately how to make it into a business.
The course is totally free, so check it out!
Have you taken my free blogging course yet?
Even if you are just thinking about starting a blog or want to figure out how to get more traffic to the one you already have, this will be useful for you.
Basically, if you want to learn the foundational elements of how I went from a desk jockey drop out to a dirtbag living in his truck to a now “successful” blogger earning enough to travel all over the place – you’ll want to check this out:
Read Next: How to Run Your Blog as a Business
Share This
Did you enjoy this post about starting a travel blog? Take a second to share it on Pinterest, Facebook, or Twitter. Thanks!
Ryan
Latest posts by Ryan (see all)
- Kazakhstan Food: Exploring Some of its Most Delicious Dishes - August 7, 2023
- A Self-Guided Tour of Kennedy Space Center: 1-Day Itinerary - August 2, 2022
- Fairfield by Marriott Medellin Sabaneta: Affordable and Upscale - July 25, 2022
- One of the Coolest Places to Stay in Clarksdale MS: Travelers Hotel - June 14, 2022
- Space 220 Restaurant: Out-of-This-World Dining at Disney’s EPCOT - May 31, 2022




Comments 12
Do you have any video clips about blogging? It would be the best thing to follow step by step so fast. Please let us know. By the way, it is such an inspirational blog and I will follow always that’s why I have bookmarked it. Thanks and have a good day!
Author
About what aspect of blogging in particular? I do have some videos, but not just one catch all about blogging in general… Thanks for following along here! 🙂
Really useful stuff for a newbie/beginners like me.
Working on my site as well. Some of the stuff was outsourced and still trying to understand how this works.
Thanks for putting so simple for me. Still a lot to learn but this page is REALLY useful.
Thank again!
Author
Thanks Douglas, glad you found the article helpful. Let me know if you have any questions!
Great Post!
i already own a blog but your blog post is quite inspirational.
Keep it UP@
Author
Thank you Yasar!
Great! You have made it simple, easy to understand. And of course, I would love to monetize my blog, so the recommendation to get a domain name instead of a sub-domain name is very helpful.
Author
Glad to hear it was helpful!
Hello Ryan! Thanks for all this wonderful info you provided! Just one question… Im pretty new to all this domain/host/blog thing! So My question is, when you purchase the domain name, it has to be the name you will give to your “internet real state :P” right, like you used desktodirtbag, not ryan ans a last name, am I right? :O thanks!!!!!
Author
Hey Ana, thanks for the question. In terms of actually paying for or purchasing the domain name whatever it might be, you’ll purchase under your full name as it appears on your credit card. There is a service called Whoisguard that is usually free for the first year or two (and is a few bucks there after) which will protect your real identify if someone were trying to look up the domain name info. So just be sure to keep an eye out for the whoisguard, and you’ll be fine!
Thanks for this post! Due to popular demand, people have requested that I blog about my upcoming trip dirtbagging around the country with a focus on climbing. Being far from a web developer, I’m basically just doing exactly what you recommend here. So, again, thanks!
Author
Nice, a think starting a website it a great thing to do. Nice to share your journey with others and record some memories for yourself… Thanks for the comment, Steve!