
Have you considered outfitting the bed of your truck to be your ultimate mobile adventure base camp? But aren’t sure where to start or what you need for your DIY truck bed camper? This article will help you identify exactly what you need to get started camping in the back of a truck and roughly how much it will cost.
Truck camping is an extremely accessible and affordable way to travel and enjoy the freedom of the road. Here are a few reasons why truck camping appeals to me:
- Freedom, you’ve got all the gear you need to be happy and have fun right in the back of the truck. 4WD allows you to get well off the beaten path. It’s the perfect way to quit your job and road trip the American West or head out on an epic national park road trip.
- Cozy, no need for tents, hotels, or so forth. Your home is just behind the cab. Your kitchen as well.
- Mobility, you can go wherever you want. Chase the sun, chase the cooler weather. Big cities or remote nothingness. You aren’t even limited to the US—it makes an ideal vehicle for major international road trips, like when we drove through Central America to Colombia and beyond.
So what exactly do you need to start camping in the back of a truck?
Here are my thoughts after nearly two years of truck camping which includes two major multi-month trips of the American West, solo camping, camping as a couple, and camping throughout Central and South America.
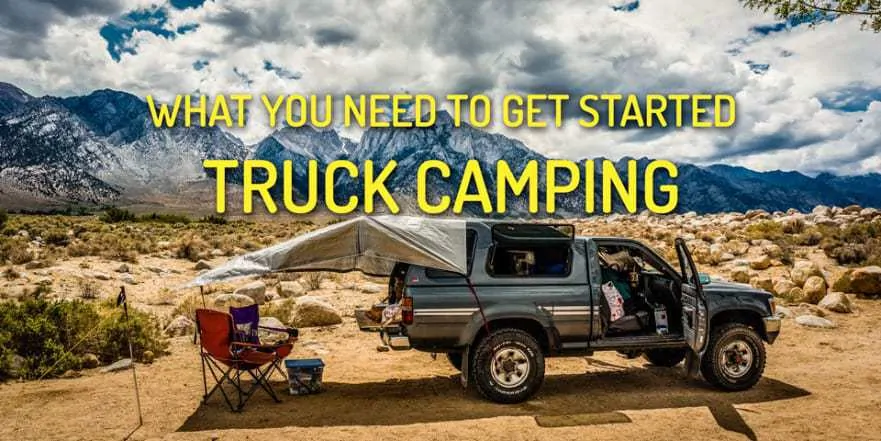
$1,500 – Truck Canopy
The canopy is likely to be your biggest expense, but this is the most crucial part.
It is, after all, your home on wheels. The canopy is your walls and your roof.
Buying new is obviously the easiest (and most expensive) way to go, but some people get lucky and find a great condition used canopy available locally. Keep on eye out on Craigslist in your area for a good deal on a good brand like Leer or ARE. You’ll probably need to be patient though. Most are not in great shape or won’t properly fit your truck.

![]()
I highly recommend getting a canopy with elevated headroom (I have the Leer 122), because you want to maximize your livable space. A carpeted headliner and contractor windows are great as well.
Read my article about how to choose a truck canopy.
$100 – Interior Build
For approximately $100 you can pick up some 2x2s, 2x4s, and plywood and outfit the back of your truck extremely well for gear organization and sleeping.
My #1 recommendation is always to keep it simple, stupid! Don’t over-engineer this thing with heavy lumber and crazy sliding drawers and things. My build can be taken out or installed in less than 10 minutes, it was cheap to put together, and is lightweight (heavier = more gas burned).
My #2 recommendation would be to maximize livable space (which goes hand in hand with the elevated canopy). There are two primary approaches to building out the back: a back shelf approach and the elevated sleeping platform approach.

Both have their merits and drawbacks, so I decided to build mine in the transformer style, allowing me to use either mode. I highly recommend this style of build for the flexibility.
I also personally recommend against carpeting the interior as it captures more dirt and dust, while the plywood base is much easier to quickly sweep out and clean.
Read my article about the backshelf vs elevated sleeping platform.
$5 – Small Brush and Dust Pan
Speaking of which, have a small brush and dust pan on hand to sweep out the back. Heading down long dirt roads and camping out in the dirt, and you’ll start dragging it inside with you.
I keep the broom just inside the tailgate in easy reach so I can do a quick sweep quite frequently. I’ve got a small metal basket there where I organize frequently used gear like my headlamp, SPOT GPS Messenger, etc.
$100 – Sleeping Pad or Mattress
Having a comfortable place to sleep cannot be neglected, otherwise, you’re in for a miserable time on the road.
It’s important to balance comfort against available space. I prefer my sleeping pad to be somewhat portable, and thus went with the Teton Sports XXL Camp Pad, but there are people who put in an IKEA mattress, or 6” thick memory foam mattresses.
Try to find something that is comfy but which can still be easily moved around for cleaning, organization, etc.
Read my article about choosing a sleeping pad here.
$20 – A Real Pillow
Yes, that was something I actually neglected when I first set out. Bring along a real pillow to sleep at night. You’ll be much happier with that than a stuff sack filled with clothes. Believe me.
But be sure to avoid memory foam pillows… Little known fact, those things turn into rock hard bricks in freezing temperatures. I had to learn that lesson the hard way on a 10 degree night in Idaho in January.
When we set out to truck camp as a couple, I ended up just going with one super big King size pillow for the both of us. Works great!
$300 – Sleeping Bag
You’ll want a decent sleeping bag if you’ll be camped in cool climates. I’ve got a 15 degree Marmot bag which I generally use opened up like a comforter. I’ve also got a cheap bed sheet that I use in hotter climates. Both are important.
It’s best to get one sleeping bag that will serve you in all different regions, and I think a 15-degree sleeping bag provides the best range. When sleeping inside a canopy, you generally won’t need less than that. I’ve gone into single digits with my bag before.
$30 – Storage Bins
Rather than building those big convoluted wooden drawers which add weight and complication, just go with a system of storage bins.
I used two long bins (Sterilite 106qt) to store all of my gear for camping or climbing, and two smaller bins to organize my food.

Regularly used items were kept handy in the side bins (things like my headlamp, cooking gear, etc) and I also had a small duffel bag for my clothes.
Plastic storage bins are cheap, easy to move around, aren’t permanent, and can pull double duty as a camp table or foot rest.
$70 – Coleman 2-Burner Stove
The first lengthy road trip I took just a Jetboil… Which is fine for a while. But if you are in this for the long haul, it’s great to have a “real” kitchen. Having a two burner propane stove which allows you to simmer, cook, and even do two things at once is a real blessing.

For the road trip to South America, we picked up the Coleman 2-Burner Stove and it served us well. It wasn’t a problem finding little propane tanks in Central America.
Those little canisters last a long time, and you can cook pretty much anything you could want.
$40 – Kitchen Stuff
Thankfully while camping in the back of a truck you can bring along regular kitchen gear, it needn’t be super lightweight titanium stuff. You’ll want the basics for kitchen stuff:
- One medium pan for frying
- One medium size pot for boiling water and cooking pasta, lentils, etc
- Strainer for said pasta
- Plastic plates, a few regular utensils
- Cheap plastic cutting board and knife
- Veggie peeler, spatula, etc.
- Portable coffee maker, coffee cup.
- Etc.
Avoid glass for obvious reasons. You can probably scavenge some of this stuff from your own kitchen. For the other stuff I’d recommend just visiting a Goodwill and picking it up cheap. Non-stick is preferable.

I also recommend storing your kitchen gear in a small soft-sided bag rather than a plastic box, due to the odd shapes and sizes of everything.
Bring along whatever you need to eat and drink well. You can bring along some “luxury” items, so long as they get regular use! For me that meant bringing along an Aeropress Coffee Maker and a handheld burr grinder to have a fresh cup of coffee wherever I am.
Here’s how I make coffee while camping.
$10 – Flat Tailgate
Speaking of having a real kitchen, it’s also really important that you have a flat space where you can cook. The easiest way to do this is to cover the tailgate with a piece of plywood leftover from your build.

Just pop off the old liner, trace the screw holes and attach the plywood.
It also serves as a more comfy space to grab a quick seat.
$15 – Water Jug
Don’t forget about water storage. I’d recommend at least a 5-gallon jug made out of hard plastic. I’ve used those collapsible carriers in the past and they always ended up springing a leak. Avoid them.
I personally use the 7-gallon Reliance water jug from REI, which has held up great.

Never miss an opportunity to top off your water jug while on the road. Especially in the desert!
$60 – Camp Chair
A cozy camp chair is absolutely crucial for life on the road. I’ve got one of these collapsible camp chairs from REI which has served me really well over the years.

If you’re not traveling exclusively to the desert and will be traveling to places with lots of trees, I highly recommend an ENO DoubleNest Hammock as well. They are extremely comfortable and highly portable.

It will make your truck camp site way more cozy and comfortable, for sure.
$50 – Power Inverter
A power inverter converts DC power to AC power (ie from your cigarette lighter adapter to a standard household plug) which is a must-have for keeping charged up and on the road.

Not only does that mean keeping your laptop, Kindle, camera, and cell phone charged while off the grid. It also allows you to connect things like a fan to keep you cool at night, interior lighting, etc.

You’ll probably want to get at least a 400w inverter with at least two outlets (be sure they have sufficient space in between them so you can actually connect two devices at the same time) along with a USB outlet or two.
$400 – Dual Battery and Isolator
Admittedly this isn’t absolutely necessary to get started camping in the back of a truck. I traveled the first year with one battery, and compensated by idling my truck every hour while using the inverter to ensure I wouldn’t get a dead battery in the middle of nowhere.

But beyond the simple outfitting of my truck, the dual battery was the best investment I’ve made in my truck camping life.

The second battery (a deep cycle marine battery) is charged as normal while the truck is running, but is isolated from the starter battery when the ignition is off, thus allowing you to run electronics without worrying about killing your battery and stranding yourself.
Read more about my dual battery setup.
A small solar panel is another great addition to take advantage of days at camp to keep your electronics topped off. I also supplement with the BioLite SolarPanel 5+ for charging my cellphone or camera while at camp.
$20 – Awning for Sun or Rain
Truck camping will put you out in the elements, undoubtedly. That’s part of the experience. But it can be tiresome when the rain won’t let up or you’re in the desert with relentless sun and no shade around.
You could pick up a fancy ARB awning, or you could just rig up a cheap tarp, some bungy cords (plastic loops), and cords with tent stakes and get the same sort of thing. That’s what I did.

$50 – Cooler
A decent cooler will come in handy for storing fresh foods and keeping them from going to waste. You’ll have to buy ice somewhat frequently in hotter climates.
If you’ve got the budget, you may consider opting for a $300 Yeti cooler, which are supposed to keep ice for up to a week and are indestructible. Or one of those amazing ARB fridges…
$5 – Velcro
Buy a package of velcro so you can stick small things to the headliner. I velcro’ed the base of some magnetic lights to the headliner as well as a number of plastic clips (more on that in a moment).
It’s a simple way to affix things in a non-permanent manner. But don’t hang anything heavy from your headliner or you risk damaging it, nor anything that will be jostled around while driving.
$5 – Curtains
Buy some thick black fabric to block your windows while sleeping and camping in the back of a truck. This serves for privacy as well as blocking out the light for sleeping. I use the velcro to attach the plastic clips (which remain stuck to the headliner) and simply clip my curtains into place at night.
I also use those Magic Shades that are meant to cover the windshield of your car on hot days, on two of my other windows in the truck. They are surprisingly dark and work great.

Instagram Adventures: Truck camping beneath the Sierras in Lone Pine, California.
![]()
$ – Gas Money
The last and most important part is to get out there and explore the world in your truck. It’ll be one of the coolest things you’ll ever do.
If you’re looking to travel more and do so more affordably, be sure to check out my book Big Travel, Small Budget, a #1 best selling budget travel book on Amazon.com
Read Next: Truck Camping Gear & Accessories (A More Complete Guide)
What do you think? What crucial items am I missing from this list? What do you disagree with? Sound off in the comments below.
Share This
Did you like this article on camping in the back of a truck? Please don’t forget to share it on Facebook, Pinterest, or Twitter. Thanks!

Pickup Truck Camping Guide
Turn your pickup truck into the ultimate adventure mobile. This printable truck camping guide will help you through the process.
Tools
Essential Truck Camping Gear
- Teton Sports Foam Sleeping Pad
- 15 Degree Down Sleeping Bag
- Two Burner Coleman Stove
- Aeropress Coffee Maker
- Hard-Sided Water Container
- Collapsible Camp Chair
- 800W Power Inverter
- Cooler for Food Storage
Road Trip Essentials
Instructions
- Get a truck if you don't have one! 🙂 I've traveled all over the world in my 1991 Toyota Pickup. The bigger the truck bed the better. Short beds have workarounds but they are not ideal unless you are quite small.
- Find a new or used canopy for your truck. Read this guide on what to look for when buying a canopy. My top recommendation is to find an elevated canopy like the Leer 122 (what I use).
- Decide on what sort of truck bed sleeping platform you want to build. The two most common are an elevated sleeping platform or the backshelf (and side-shelf) approaches. I did a transformer setup for the best of both worlds, here is my step-by-step guide building the transformer style setup.
- Purchase essential gear to start truck camping which includes a sleeping pad or mattress, sleeping bag, two-burner stove, cooler, storage boxes, etc.
- Go on a test truck camping run at a free boondocking campsite without amenities to test your setup. Read more about finding free camping in the USA.
- Consider your electronics system and how you will charge devices while on the road. You could get an outside system like the GoalZero Yeti but I recommend using a dual battery and isolator under the hood.
- Join the Pickup Truck Camping group on Facebook for an amazing, like-minded community where you can ask questions and get answers from experienced truck campers. Be sure to pick up your #PTC stickers, shirts, and swag!
- Review the detailed truck camping gear and accessories (plus a packing list) and start planning your epic truck camping adventures. Might I suggest this national park road trip, the most scenic drives in the USA, or this west coast USA road trip? Here is more info on road trip planning for you, based on 10s of thousands of miles of adventures.
- Sign up for more truck camping tips, tricks, and info delivered straight to your email inbox from yours truly.
Notes
I hope this helped you get started with truck camping! I know it can be confusing when you are just getting started, which is why I started writing so extensively about it.
If you have any questions about truck camping, road trips, budget travel, or anything else shoot me an email at ryan@desktodirtbag.com.
(I love getting questions! That is how I get ideas for my blog posts and what to write about!)
Recommended Products
As an Amazon Associate and member of other affiliate programs, I earn from qualifying purchases.


Ryan
Latest posts by Ryan (see all)
- Kazakhstan Food: Exploring Some of its Most Delicious Dishes - August 7, 2023
- A Self-Guided Tour of Kennedy Space Center: 1-Day Itinerary - August 2, 2022
- Fairfield by Marriott Medellin Sabaneta: Affordable and Upscale - July 25, 2022
- One of the Coolest Places to Stay in Clarksdale MS: Travelers Hotel - June 14, 2022
- Space 220 Restaurant: Out-of-This-World Dining at Disney’s EPCOT - May 31, 2022
Comments 27
How do you open and close the tailgate from the inside. I am not 18 anymore.
Author
I just grab it while seated and close it… I’ve heard of people wrapping a little strap around there to help them lower it and raise it with control.
Hey Ryan, I just moved an I’m new to truck camping. I’m looking at truck bed tents as a cheaper shelter option until I can afford a canopy. Got any to recommend? I’ve got a Ford F150 with a standard 5’5″ bed.
What if you don’t have access, at all, to a place to cut wood for the interior? Are there any prefab options that are out there or would you suggest something different? All my friends and family rent, so a workshop is not something I have access to. Thanks! And great work!
Author
I’ve seen some prefab type carpeted kits like this one: https://socaltruck.com/carpet-kits/ but I have no experience with them or their quality… Might be worth looking into though, if you have no one to build one.
We attached a solar panel to the two bar racks that came with our leer sportsman canopy (hangs from U shaped bolts beneath the bars). Louie attached the panel to a deep cycle battery and an inverter. We Used the power to charge our electronics and run nitetime fans for cooler sleeping…
we also purchased a tent that attaches to the back giving us privacy when needed. It is also a stand alone tent. We also travel with a small portapotty. (We love our Tundra extra cab space!)
Author
Nice! What is the tent you purchased that attaches to the back?
What size tarp do you use on the back of your rig?
Author
Hey Larry, I think it’s a 6×8 tarp if I remember correctly… It might be an 8×10 though.
Thank you for sharing all of this, and it seems like such a good time! It is really neat you can use your car as your moving home!
For locking it from the inside, on my shell I have a place I can use those window security clamps. They are just the small metal ones with the screw you tighten that people use in houses for anti-theft.
Just one of those simple metal hooks, attached to an eyelet, I think. You just want to be sure that the lock is something that can be put on and taken off quickly.
What’s the Facebook link
Author
Pickup Truck Camping Facebook Group — http://www.facebook.com/groups/truckcamping
Instead of spending a fortune for the Yeti cooler, take a look at the RTIC coolers. I have one of their cups and it works just as well as my friends yeti cup. Great article. This is something I have been looking into as I just picked up an 84 toyota xtra cab pickup.
Author
That’s a great tip, Michael! I’ve heard a bit about those RTIC coolers, and they are pretty much the same thing as Yeti, just not made in the USA. I’d have a really tough time spending $300 for a cooler…
Another one to try is the Ozark Trail cooler from Walmart. Not quite as highly rated as the Yeti, but works much better than my old Coleman Steel Belted. $184 from Walmart. Little cheaper. My biggest complaint is the weight (always something huh?). The weight by itself is rather heavy, and when loaded, it makes you wish for a camping buddy.
Some type of recovery gear. I picked up a couple of 4 ton come-alongs, a big-ass chain, tree strap, d rings, etc. I also have a hi-lift and their recovery gear bag. Thank the FSM I’ve never had the need.
Also, stowed a tire repair kit and a 12 volt air compressor. Ya never know…
Author
Yeah, recovery gear would probably be a good idea, depending on what sorts of situations you are getting into. All that stuff was recommended for overlanding through Central America, and I had none of it, haha. Thankfully we never had any issues! Thanks Kenny!
…livin’ on the edge, Ryan!
On my Leer, I have an interior lock release. I lock it using the key lock. Then I can unlock it from the interior using the release.
Author
On your Leer? That’s interesting! You can lock it from the inside using your key? I don’t recall having that option when I bought my canopy, but certainly worth looking into… How to lock it from the inside is like the #1 question I get, and I still don’t have a definitive answer, since I don’t lock mine.
Sorry, I lock it from the outside. Close it once inside. Then it’s locked. I use the interior release to unlock from the interior.
Author
Ah okay, interesting. I’d like to see a picture of how that works. Mine is an actual metal latch, so you can’t close it when it is locked. Old School…
How do you lock your camper from the inside so that you are safer while sleeping
Author
Hey Sara, great question. Honestly that’s not something I’ve done, nor worried about in all my time truck camping from anywhere between Canada and Costa Rica. I’ve thought about how I would do it, if I were to do it, and I think a simple latch attached to the wood frame which could be slipped over the metal brackets would probably be the best way. Just one of those simple metal hooks, attached to an eyelet, I think. You just want to be sure that the lock is something that can be put on and taken off quickly.
There have been some discussions and ideas about this in the Truck camping Facebook group. If you haven’t joined yet, be sure to do so.
Hi Sara!
If you think about it, no matter how you lock your entryway, if someone, or something, wants to get to you, they will. Its the same deal as living at home. And just like living at home, I sleep with a gun handy. I prefer my 12 gauge shotgun or a .45 long colt revolver. I realize this seems extreme at first thought. However, if your entryway is being broken into, while you are inside, whatever is coming does not have your best interest at heart. Camping with a dog as a partner can be a plus. There’s nothing like a barking dog from inside your sleeping quarters to scare most opportunist bad guys away. However, in my experience, this type of scenario rarely happens. Most of the time, its the wild critters rummaging through your stuff thats the problem.